Written by SOWLE RV
November 29, 2019
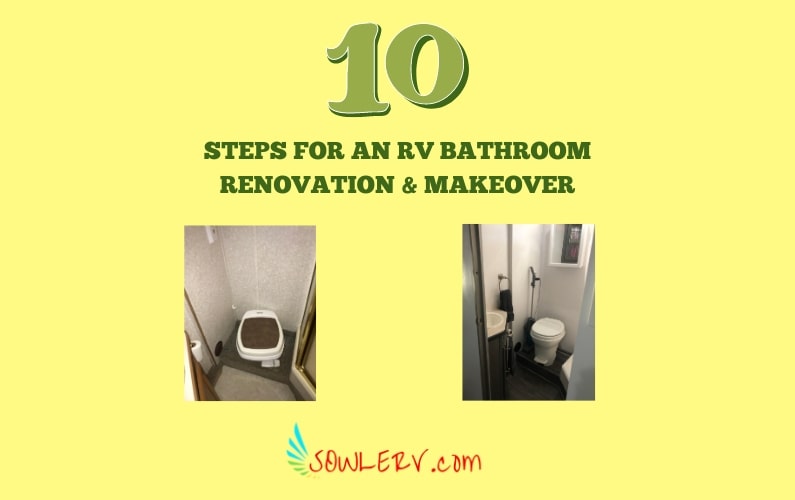
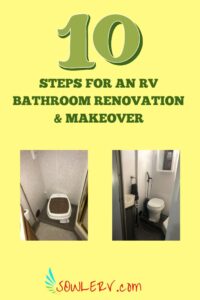
RV Bathroom Renovation and Remodel
In a used RV, one of the absolute WORSE things to have to deal with is the RV Bathroom Renovation and Remodel. UGH! YUCK!!! This RV Motor Home was no exception!
Removal of Old Toilet
The bathroom is the second to last upgrade I did on the SOWLEMOBILE. As in most RVs, the bathroom floor had linoleum. The bathroom linoleum was removed at the same time as I did the hallway and kitchen area flooring. You can read more about that in Removing and Replacing RV Flooring.
Consequently, what was left over after the removal of the bathroom linoleum was truly horrifying. OK, MAYBE I am exaggerating that just a little bit. On the contrary, any manufacturer that installs carpet on a pedestal that a toilet sits on is not thinking about hygiene.
To add insult to injury the toilet was the appropriate height for a toddler.
So, when any male used the facilities there was a splash factor that came into play. This became abundantly clear when I removed the carpet. I hate the smell of dried urine. Yes, a mask and gloves were used and necessary. I had to pull the toilet out to get to the staples holding all the carpet down.
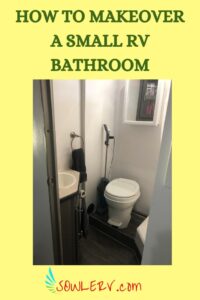
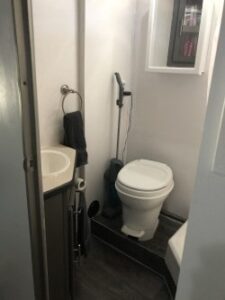
Addition of New Toilet
We had a plan to purchase a new RV toilet when we first saw the one in this motorhome. For this we chose the Thetford Aqua-Magic V RV Toilet Pedal Flush with Hand Sprayer High Profile in white.
The new toilet raised the height of the toilet more than we wanted. However, we didn’t want to sit down on one that would require a lift to help us get up! We got the taller poised and it seems to be working great.
Painting the Walls
With the floors all cleared out I started cleaning up the walls. One wall had the press paper peeling off badly. Since I had to deal with this once before, I knew the paper would not adhere back down. So, I began the painstaking task of removing the paper. If you can avoid having to do this I would try. The press paper seems to stick well in some areas while coming off in sheets in others. This can be a slow boring process but if you start peeling you must peel the whole wall.
Once that was completed, I primed the area that had the glue residue on it so I could seal it down and paint it when the time was right.
Painting the Cabinets
Thankfully, the cabinet doors were already out and painted from when I did the living room cabinets. You can read more about that in RV Living Room Makeover.
Electrical Covers and Vent
After removing the electrical covers and the vent, I thought I was ready to paint the bathroom. So I thought…
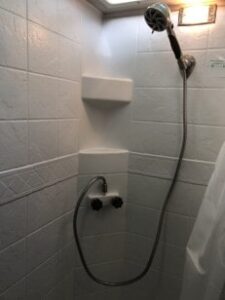
RV Shower
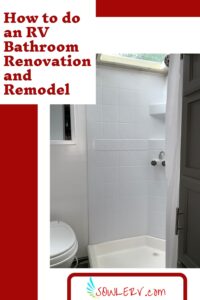
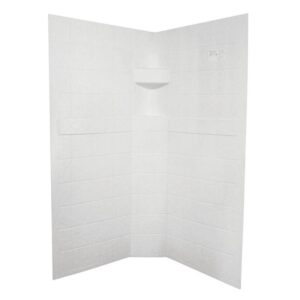
However, when looking things over in the bathroom, I noticed that the fiberglass shower surround was broken at the top where the screws that held it in place went through. I had plans to fix the surround and paint it. However, after attempting to repair the surround with a nitrogen welder, I decided that with as low cost as this item was, I would just replace it instead of taking more time to fix it. So, I removed the fiberglass shower surround and purchased the ABS Neo Shower Wall that measures 32” x 32” x 67” in White.
Painting the Bathroom
While awaiting the delivery of the new RV Shower Wall, I went ahead and got started on painting. I painted all the walls in the bathroom white. The cabinets and the storage closet in the bathroom, I painted grey for contrast. As for the flooring, we did the same as the rest of the RV, a grey plank appearance linoleum. NO CARPET!!!
Returning to the Shower Walls
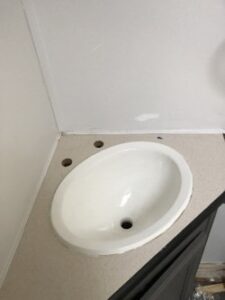
Finally all the painting and flooring was completed. The new Shower Wall had been delivered. Now I wanted to install the new shower surround, but the shower floor was an old, yellowed fiberglass. The new surround was white, so something had to be done.
After many hours of research, I purchased the Rust-Oleum Tub and Tile Refinishing 2-Part Kit, White. It worked very well to give the shower floor and the sink a new porcelain look. It does require two coats for proper coverage with 4 hours between coats. If you follow the instructions carefully it turns out great! Once the sink and shower were taken care of, I finally was able to glue the new ABS Neo Shower Wall in place.
Removing Stains from RV Ceiling Fabric
We had major water stains in the fabric ceiling of most of the RV. This was because of the roof needing replaced.
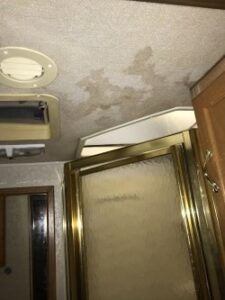
As you can see in the photo above, the bathroom was certainly no exception to that. Once we were done with Replacing an RV Roof we tackled the ceiling inside. You can read all about that in How to Remove Stains from RV Ceiling Fabric.
Other Updates for this RV Bathroom Renovation and Remodel
Additionally, we installed a new bathroom RV Skylight. My wife says it is the best addition to the entire RV Makeover! She says “it’s like showering in nature, but with privacy”! I have a feeling this will be a new addition to our Travel Trailer bathroom next!
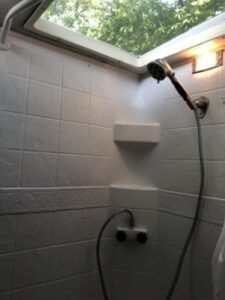
Sink and Shower Head
We also installed a new bathroom sink Dura Faucet DF-PL100-SN RV Single Lever Bathroom Faucet in Brushed Satin Nickel. This was to match the new Oxygenics Shower Head Silver Standard Fury Hand Held Sprayer Kit in Brushed Nickel. This is by far the BEST RV Shower Head we have ever had. We actually purchased a second one for our Travel Trailer!
Bathroom Vent
As I said before, I had removed the Electrical Covers and Vent to paint. We really didn’t want to reinstall the very yellowed and stained vent back into this freshly renovated and remodeled RV Bathroom. So, we also installed a new Fan-Tastic Vent 1250 Series White RV Roof Vent, 3-Speed Manual Crank RV Vent Fan, Smoke Dome RV Vent Cover. This was another great update for the motorhome!
Installing a Mirrored Cabinet
Because the original medicine cabinet was ugly, very old, and very used, we decided to go ahead and replace it as well. We purchased a basic white Tangkula Mirrored Bathroom Cabinet, Wall Mount Storage Organizer, Medicine Cabinet with Single Door.
Replacing Hardware
We replaced the hardware in the bathroom with the same Satin Nickel Cabinet Hardware Euro Style Bars we used throughout the rest of the RV. We also replaced the toilet paper holder and we added a hand towel holder, both in Satin Nickel, to match the sink faucet and shower head. Angie also wanted a Towel Bar that hangs on the door to the cabinet under the sink like she has in our Travel Trailer, so she got that as well.
In Conclusion
Although the RV Bathroom Renovation and Remodel was one of the nastiest projects I had undertaken, it proved to be the best makeover we did. We love it and for the smallest area in the RV it really turned out nice!


RV Camping: Renovation, Remodel, and Makeover Articles you don’t want to miss on SOWLERV.com!
Renovation, Remodel, and Makeover, OH MY!
How to do an RV Bathroom Renovation and Remodel
How to Do an RV Bedroom Makeover in 7 Easy Steps
How to Do an RV Living Room Makeover in 8 Steps
How to Do an Easy RV Kitchen Makeover
How to Replace RV Awning Material in 5 Safe Steps
How to Remove Ugly Stains from Your RV Fabric Ceiling [with photos]
How to Remove and Replace the Flooring in Your RV Camper Trailer
Front Cab Rehab of a Motorhome
12 Steps to Replace a Destroyed RV Roof [detailed photos included]
Related Articles
![Purchasing Private RV Camping Land: 3 Important Steps to Follow from Our Experience [SOWLE Journeys of Faith]](https://sowlerv.com/wp-content/uploads/2024/05/Private-RV-Camping-Land-3-Important-Steps-to-Follow-for-Finding-and-Purchasing-From-Our-Experience-SOWLE-RV-FI-min-400x250.jpg)
Purchasing Private RV Camping Land: 3 Important Steps to Follow from Our Experience [SOWLE Journeys of Faith]
Private RV Camping Land: 3 Important Steps to Follow for Finding and Purchasing From Our Experience [SOWLE Journeys of Faith] Exploring the Benefits of Owning Your Own Private RV Camping Land Owning Your own private RV camping land offers a unique blend...

The Ultimate Guide to Finding the Perfect TV for Your RV
The Ultimate Guide to Finding the Perfect TV for Your RV Whether you just bought an RV and are needing to purchase an additional TV for the bedroom or purchased a used RV that didn’t include a TV, deciding between the numerous brands, styles, and options that are...
7 Reasons Why THIS is the Best Portable Barbecue Grill for RV Camping!
7 Reasons Why THIS is the Best Portable Barbecue Grill for RV Camping! We needed to purchase a new Portable BBQ Grill to use with our Motorhome for when we get to go RV Camping again. We researched MANY barbecue grills trying to find the best barbecue grill for RV...