Written by SOWLE RV
November 8, 2019
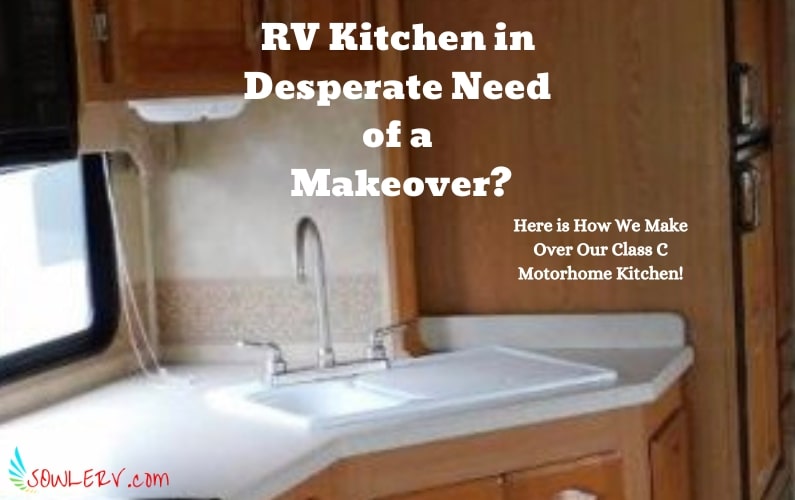
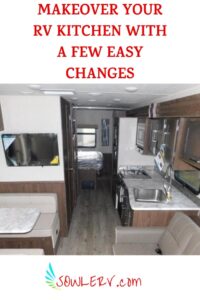
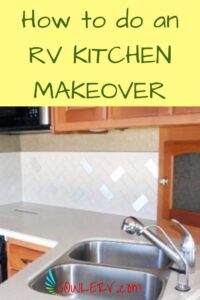
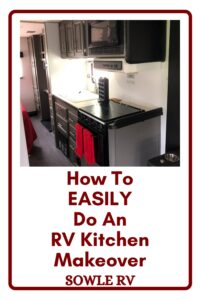
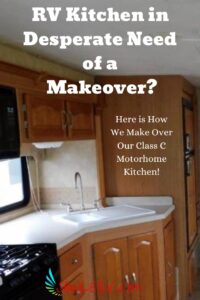
RV Kitchen Makeover
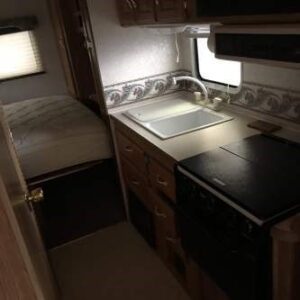
The kitchen in an RV tends to be one of our favorite areas, probably because that’s where we spend A LOT of our time, LOL! We are not used to having a HUGE kitchen in our Travel Trailer; however, it is MUCH larger than the one we have in our new-to-us Motor Home. It is more like a hallway than a kitchen. Now that we say that we are realizing, it IS a HALLWAY! When we got ready to do the RV Kitchen Makeover, we knew we had to do what we could to make the kitchen appear larger.
Walls and Back-Splash
First I had to remove the wall paper. There was a 4” border of wallpaper at the bottom edge of the kitchen back-splash. To remove this, I simply used a damp cloth and i was able to pull it right off. Next, I removed the microwave along with the face-plate to make painting easier.
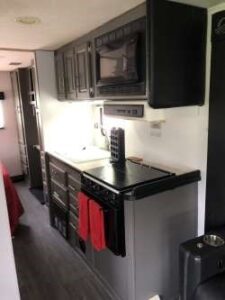
Then I painted the walls and the back-splash with white PPG Paint. You can purchase the white paint on Amazon and take it to your favorite hardware store to have it color matched to any color you desire. Most noteworthy, PPG Brand Paint is the best to use in my opinion.
I also had to remove an end cap on the cabinet that was lined with a blue velour cloth and had it reupholstered with black vinyl.
Cabinet Doors and Drawers from Kitchen
First, I removed all the cabinet doors and hardware. Next, I cleaned the wood on the cabinet doors with TSP, lightly sanded them, primed them and then painted them with light grey PPG Paint. Finally, I replaced the hardware with new Satin Nickel Cabinet Hardware.
Upper and Lower Cabinets
Next I began working on the Upper and Lower Cabinets. I cleaned them all with TSP also. These are a pressed board with a crappy laminate paper overlay. Not a lot sticks to it so if you have this and are going to paint it you need to use PPG Primer to prime it or buy the “2-in-1 kit to paint it.” I painted the cabinets inside and out with the same grey paint.
The Front Edge of Counter-Top
There was a fake wood edging around the countertop. After cleaning, prepping, and painting it, the paint would flake off, so I decided to prep it better, sand it down thoroughly. Once I was sanding it, the fake wood started coming off and that is when I realized it was nothing more than a painted rubber. So, I went ahead and scuffed it, primed it and painted it and the paint held once I was able to get the fake wood stuff off of it completely.
Sink and Faucet
The Sink was in really good shape with no scratches and honestly looked like it had hardly been used. We decided we were going to keep the sink. The faucet, however, was a different story. The faucet was broken, so we knew we had to replace it. We went with the Peppermint Designer Brushed Nickel Pull Down Kitchen Sink Faucet RV Modern with Pull Out Sprayer Single Layer with Deck Plate.
Painting the Breaker and Fuse Panel Cover
The breaker and fuse panel cover were in the lower cabinet below the sink and it was the old looking brown and was riveted to the breaker and fuse box. I took it off, sanded it down, and painted it black. Then riveted it back in place. Now it looks brand new! Easy fix! I also took the lighting off the bottom of the cabinet that was 12-volt wiring so I could paint around it easier.
Painting the Refrigerator
Next, I moved on to the refrigerator that had a wood paneling front. We didn’t like it at all so we painted it black. With the fridge front paneling on our Dometic fridge with upper freezer, there are screws that hold a plastic trim cover that keeps the paneling in place. You need to pull out on the wood panel cover and see if it is glued on the backside like ours was. If it is, you will have to break it loose CAREFULLY to get it off to avoid damaging the wood. Once the panel is off, sand, prime, and paint it. Once dry, reinstall it and the fridge will look so much better!
Fridge BEFORE
Fridge AFTER
Replacing the Floors in the Kitchen
Furthermore, I had to remove and replace the flooring in the kitchen area. You can see them a little in the photos below and read more about that in our article Removing and Replacing RV Flooring.
Kitchen Floors BEFORE
Kitchen Floors AFTER
Kitchen Accessories
Finding the right accessories for loading a new RV is important. Angie realized that transporting stuff back and forth between our Travel Trailer and this Motorhome was NOT going to be the way to go, so she went online to Amazon and got all we needed. She says she is in no way a decorating type person, however she does the basics. Her themed colors for the motorhome are Black and Grey with a “pop” of Red.
What we needed when loading up our RV Kitchen for the first time was the following 15 Items:
#1 Kitchen Hand Towels
#2 Spoon Rest
#3 Pot Holders
#4 Toaster
#5 Collapsible Colander
#6 Nesting Pots and Pans
#7 Plates and Bowls
#8 Nesting Skillets
#9 Manual Can Opener
#10 Eating and Cooking Utensils
#11 Dish Scrub Brush
#12 Salt and Pepper Shakers
#13 Ice Cream Scoop
#14 K-Cup Carousel
#15 K-Cup Coffee Maker
In Conclusion
Once I got everything painted, I went back with reassemble everything. I put new Satin Nickel Hinges on all the cabinets. Additionally, I put new Satin Nickel Pull-Handles on all of the cabinet doors and drawers. This is a good time to inspect your drawer slides and lock clasps. Over the years the nails and staples that hold them in place start to loosen or flat come apart. Now is the time to reinforce them to prevent a further issue.
The Paint we used in this RV Kitchen Makeover was a simple PPG Brand Paint. We chose the colors we wanted to go with, had it mixed, and took it home to paint. Nothing special about the paint really, except that it just simply worked very well for our RV Motorhome. We looked into painting the cabinets with specialty paints like the all in one cabinet paint kits and they work well too but I’ve painted for years and the PPG Brand Paint works just as well, if not BETTER!


RV Camping: Renovation, Remodel, and Makeover Articles you don’t want to miss on SOWLERV.com!
Renovation, Remodel, and Makeover, OH MY!
How to do an RV Bathroom Renovation and Remodel
How to Do an RV Bedroom Makeover in 7 Easy Steps
How to Do an RV Living Room Makeover in 8 Steps
How to Do an Easy RV Kitchen Makeover
How to Replace RV Awning Material in 5 Safe Steps
How to Remove Ugly Stains from Your RV Fabric Ceiling [with photos]
How to Remove and Replace the Flooring in Your RV Camper Trailer
Front Cab Rehab of a Motorhome
12 Steps to Replace a Destroyed RV Roof [detailed photos included]
Related Articles
![Purchasing Private RV Camping Land: 3 Important Steps to Follow from Our Experience [SOWLE Journeys of Faith]](https://sowlerv.com/wp-content/uploads/2024/05/Private-RV-Camping-Land-3-Important-Steps-to-Follow-for-Finding-and-Purchasing-From-Our-Experience-SOWLE-RV-FI-min-400x250.jpg)
Purchasing Private RV Camping Land: 3 Important Steps to Follow from Our Experience [SOWLE Journeys of Faith]
Private RV Camping Land: 3 Important Steps to Follow for Finding and Purchasing From Our Experience [SOWLE Journeys of Faith] Exploring the Benefits of Owning Your Own Private RV Camping Land Owning Your own private RV camping land offers a unique blend...

The Ultimate Guide to Finding the Perfect TV for Your RV
The Ultimate Guide to Finding the Perfect TV for Your RV Whether you just bought an RV and are needing to purchase an additional TV for the bedroom or purchased a used RV that didn’t include a TV, deciding between the numerous brands, styles, and options that are...

7 Reasons Why THIS is the Best Portable Barbecue Grill for RV Camping!
7 Reasons Why THIS is the Best Portable Barbecue Grill for RV Camping! We needed to purchase a new Portable BBQ Grill to use with our Motorhome for when we get to go RV Camping again. We researched MANY barbecue grills trying to find the best barbecue grill for RV...